The posts below where recovered from WayBack Macine
Since then, We moved from Edinburgh to Fife, Many thanks to Fergus and others for helping me move the contents of the garage.
The house took a couple of years to go from a complete hole to what it is today, and we are more than happy living here.
With the house fixed up we then started on other projects, The garage roof for a start, then the errecting of a big hut to keep all sorts of stuff that was keeping the garage being used productively, then I started working on a bike, which itself stalled due to parts unavailablity, however that problem has just been solved within the last week with parts winging their way from Holland.
The only thing that has happened with the car is I stated to cut out the brackets for the suspension from 50x3mm SHS, needless to say I've done a few and then got sidetracked again.
The fact that I've resurected this blog probably means that things are starting to come back to car building again.
So watch this space!
Sunday, 8 November 2009
Wishbone Ash it
Originally Posted 20/4/2005
Bollox to them
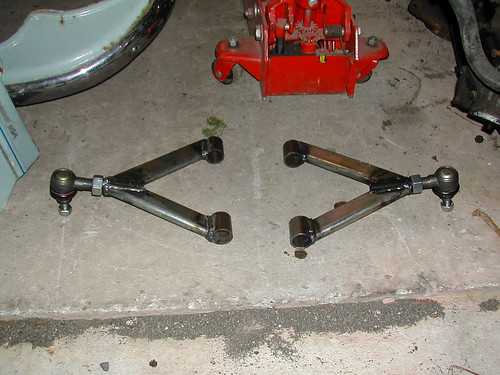
I made a jig and cut my steel to make the wishbones.
Being the real impatient sort I strted to screw the top balljoint in to the bone before it had cooled, it must have cross threaed cause it stuck in like that stuff to a blanket, to the point of damaging the threaded tube in the process of removing it, anyways after a Plea on the locost builders website I got loads of useful advice and I have bought a suitable tap and managed to rescue the fabricated wishbone, although I’m now not happy with the bush tube alignment and am going to make a much better jig that will keep these tubes in alignment
I think the bones made out of the oval section steel will look quite nice, check out the photo and form your own opinion.
Bollox to them
I made a jig and cut my steel to make the wishbones.
Being the real impatient sort I strted to screw the top balljoint in to the bone before it had cooled, it must have cross threaed cause it stuck in like that stuff to a blanket, to the point of damaging the threaded tube in the process of removing it, anyways after a Plea on the locost builders website I got loads of useful advice and I have bought a suitable tap and managed to rescue the fabricated wishbone, although I’m now not happy with the bush tube alignment and am going to make a much better jig that will keep these tubes in alignment
I think the bones made out of the oval section steel will look quite nice, check out the photo and form your own opinion.
Minor Problems
Originally Posted 1/3/2005
Goddamit, I’ve bought a Morris Minor, originally to be used for donor running gear, however it just looked kinda cute so I’m giving consideration to fixing it up and using it as a wee runaround, sort of a rolling restoration, really depends on the condition of the chassis in places other than the location of obvious accident damage, photo to follow.
Update:- Looks more and more like the Minor is going to be a Donor, so its time to rip out the engine gearbox and back axle, should end up nice and period looking though with a slightly underpowered engine and wire wheels, black plates and hopefully road tax free.
Update 13/06/11
Black plates are a no no, no chance pf free road tax. :-(
The Sun came out
Originally Posted 3/2/2005
Well the sun came out and with it the desire to go back into the garage, its official! the work has restarted, over the last couple of days I managed to cut out the small panels where the rear trailing arm mounts are, will be finishing them off tonight ready for fitting. After I’ve picked up the cat from the vet, Poor charlie, the operation to get her bits removed went awray in the recovery stage and had to have her insides sewn up again, apparently she’s learned the harmonica and is playin the blues, in lockdown
Feels good to be back at it.
Apart from the cut finger.
Mental note:- engage brain before picking up sheets of steel.
“Been a long time since I wrote some scroll”
Originally Posted 10/11/2004
Ahem sorry about that!
So its been a while and not a lot has really been happening, a couple of modifications have been made to the chassis. To give a more lotusy appearance I’ve dropped the back of the rails at the occupants elbow down a little to be in keeping with the original 7.
I’ve managed to cut out the floor and shaped it to fit.I’ve decided to plug weld the floor to the chassis. This involved punching a hole every in arounf the perimeter of the plate to weld to the main frame, and a few other places besides, the old hands are hurting now. The bloody punch kept falling appart as I was using it (cheap tools cost you dear) oh and the nibbler also broke but was replaced by machine mart without protracted negotiations.
After puching out all the holes I did a few practive plug welds on the piece of scrap, only to find I can’t plug weld to save myself, the welds were just not strong enough. Turning up the welder was causing the ring main RCD in the garage to trip out, so I’ve rigged up a line of the back of the main RCD wich seems to be stayin up without problems. Also purchased a spot wled shroud from weldco and had a wee practice with the welder set to max power I performed a couple of welds which required substantial wacking with a hammer to break, and tore out metal from the tube so I’m now happy that I can do it but am thinking of rigging up a spot timer before welding the floor on just for consistancies sake.
Looks like LeMans is a bit of an optimistic target for completion but hopefully next summer at some time is the current estimate.
Body Work
Originally Posted 20/9/2004
Nosecone, Swept front wings, and rear wings have all arrived and taken up residence in the house.Starting to received complaints from “Full Stop” about my project being evident in every room in the house so I thought I should move the bodywork into the garage, couldn’t resist this photo oporchancity
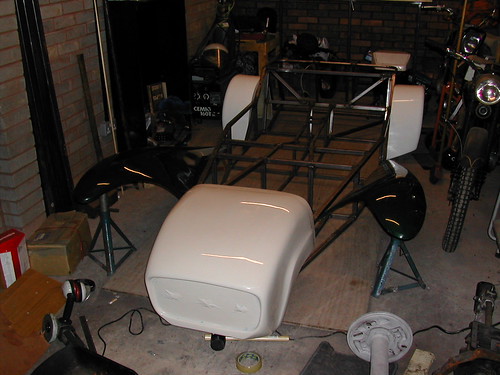
Nosecone, Swept front wings, and rear wings have all arrived and taken up residence in the house.Starting to received complaints from “Full Stop” about my project being evident in every room in the house so I thought I should move the bodywork into the garage, couldn’t resist this photo oporchancity
Axle Blast
The axle was sent off to the blasters and came back all clean and rust free, unfortunately the integrity of the bowl on the back of the diff was a bit suspect and was porous, only found out when it was turned on its back and I noticed some nasty oil on the garage floor, not the end of the world though as I’ve plated up the bowl so it doesn’t leak any more.
However since doing this there is one area that feels like a small amount of distortion is catching on the diff cage, so its time to remove the half shafts and diff and a few carefully aimed blowes on the inside of the diff housing should give adequate clearance, and give me a chance of checking the state of the two holes I blew in the casing when welding in plates.
Funnily enough though since it was cleaned and possibly moved about a lot the small amount of oil in it must have made its way to the pinion bearing which doesn’t feel horrible anymore, it just feels like a good oiling may sort it out, not expensive to fix, but better not to have to split the diff as its not a simple job.
Lady of the River
A burn local to the house is littered with shopping trolleys made out of lovelly oval section high quality steel, a quick incantation brought these to the surface and with my trusty hacksaw I’ve liberated an amount of nice bright steel suitable for making up wishbones.
The cost of taps and drills means that ready threaded wishbone ball joint tubes have been purchased along with eye tube/bush sets, and upper and lower ball joints, suspension is on the way.
Rear suspension should come courtesy of Nissan Bluebird.
The cost of taps and drills means that ready threaded wishbone ball joint tubes have been purchased along with eye tube/bush sets, and upper and lower ball joints, suspension is on the way.
Rear suspension should come courtesy of Nissan Bluebird.
Welding Done
Originally Posted 6/9/2004
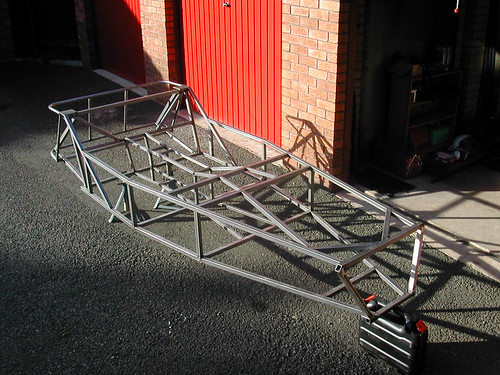
Managed to finish welding the chassis over the weekend, much to my surprise and delight I might add it’s sitting flat and level on the workboard. had a wee panick when it was dumped flat as it rocked about but this disappeared after the bottom welds where ground flush.
This was acheived by welding front to back, performing a single weld on each side then doing the respective weld ont he other side. I welded a great deal of vertical welds first and think this may have been the key to minimising/negating the chance of a banana.
There is a slight bow on the rear tube at the bottom of the main chassis part but not enough to be bothered about
Stage 2 Complete
Originally Posted 30/08/2004
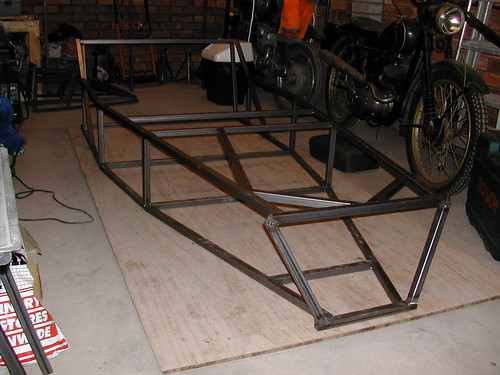
The chassis is comming along nicely with the transmission tunnel complete and is now in a state where the next stage is to fuly weld the whole chassis together. This is a big step as I’m a bit apprehensive about doing this as things can go real pear shaped at this satge, although having taken advice from a number of sources I’m goint to procede with this next week.
Since the photo below was taken, the panhard rod support tube Z, the final two H tubes at the front of the tunnel and the engine support tubes G1 and G2 have all been added
Stage 2 almost complete
Originally Posted 10/8/2004
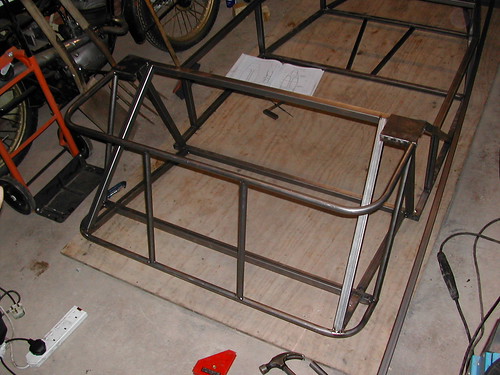
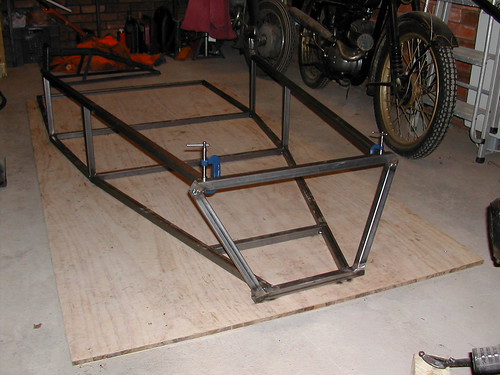
Barring the panhard rod support tube the luggage compartment is complete. The design as stated earlier is a slight departure from the book in so much as it has a tubular bottom rail and the tubes W1 and W2 have been set to the outside of the shock mounts.
Time now to get on with the transmission tunnel, but due to circumstance it may be delayed a couple of weeks, though in the photo below you can see the very beginings of the tunnel
Beezer
Originally Posted 29/7/2004
The deal was done, I’m now the owner of some rusty bits with wich to start the next stage of the build.Thanks to the two John’s for helping!Thanks to all those who offered help, might take you up on offers yet
The deal was done, I’m now the owner of some rusty bits with wich to start the next stage of the build.Thanks to the two John’s for helping!Thanks to all those who offered help, might take you up on offers yet
Eureka
Originally Posted 19/7/2004
The donor search may have come to fruition, if everything goes according to plan I’ve got the cuurently required stuff from one source, just a matter of getting transport and convienient times arranged between me and the seller, a fellow locost builder.
So!
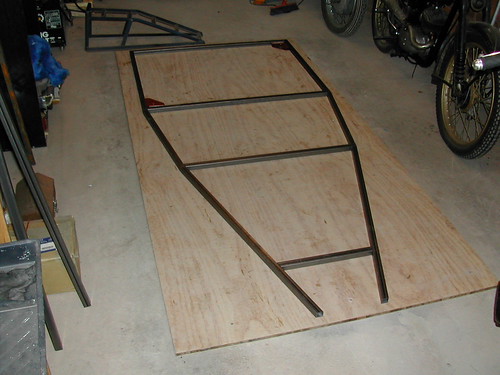
Down to the chase…Bought myself a pipe benderBent some tubes up for the top and bottom of the luggage compartment, and managed to get a very similar shape on both of them.
Gettin brave now altering the basic design.
Altered the ends of the 1″ RHS tube RU1 and Ru2 in a rather natty (methinks) way by cutting a long 2″ by 1/4″ wedge out of each side of the tubes at the bottom, welding up to give a 1″ tube that narrows down to 3/4″ at the end, which after profiling will fit to the the round section tube at the bottom of the luggage area.
Once I’ve picked up the donor parts I can start building the tunnel!
So. I’ll be shuffling about the garage space suruptitiously kicking sand into the gravel
The donor search may have come to fruition, if everything goes according to plan I’ve got the cuurently required stuff from one source, just a matter of getting transport and convienient times arranged between me and the seller, a fellow locost builder.
So!
Down to the chase…Bought myself a pipe benderBent some tubes up for the top and bottom of the luggage compartment, and managed to get a very similar shape on both of them.
Gettin brave now altering the basic design.
Altered the ends of the 1″ RHS tube RU1 and Ru2 in a rather natty (methinks) way by cutting a long 2″ by 1/4″ wedge out of each side of the tubes at the bottom, welding up to give a 1″ tube that narrows down to 3/4″ at the end, which after profiling will fit to the the round section tube at the bottom of the luggage area.
Once I’ve picked up the donor parts I can start building the tunnel!
So. I’ll be shuffling about the garage space suruptitiously kicking sand into the gravel
Another Lost weekend
Originally Posted 11/7/2004
Another weekend goes by with little work done to the chassis, too many Grand Prix to watch, however after watching the macher beating everybody again… Managed to drag myself into the garage and cut and weld some tubes.
Getting to the stage where I’ve only got the tunnel and rear compartment to do to comlete the main chassis work, probably a bit optimistic to say the end of the month for a complete frame but it should not be much delayed than that.
The search for running gear continues!
Slow Progress
Originally Posted 7/7/2004
After an unproductive weekend, other than reinforcing the vice mounting points on the bench, Tubes J1 and J2 received the tack welding they deserved, however they had to be repositioned as I tacked them slightly offset. Further problems where encountered when assembling rear tubes K1 and K2 with K3 and K4 on tube O.
I bought the book so why not read the relavent paragraph before starting, saves a lot of time, anyway things are back on track workwise with progress being made nightly.
This project may come to a grinding halt, as a suitable donor vehicle is proving to be hard to find.
I have an engine A+ Morris Ital should provide a gearbox and back axle which I suppose is the spiritual succesor to Standard axles (thats Vanguard rather than ISO for historians). Still a few scrappies to try locally before looking further affield. Have heard that Lada axles are dimensionally similar to esort axles a MK2 escort would still be the easiest to build with, just getting a bit jaded by scrappies laughing in my puss, though humour is usually involved when the Ital is mentioned, After all it is a marina, which after all was a rebodied Minor, which after all was a …
check out the history yourself if interested.
If things dont improve on this front, a reversing diff may have to be obrained and a big F.O. bke engine a rethink on the rear suspension and a complete rethink on the style of the car.
Let There Be Height
Originally Posted 1/7/2004
After Contruction of front section and Tubes H, frame rails J1 and J2 were cut and profiled, turned out to be too big (1/2″). Existing chasis dimensions rechecked and found to be as plan. Better too big than too small and within the allowance for spare tube in the stock length so no problemlo
After Contruction of front section and Tubes H, frame rails J1 and J2 were cut and profiled, turned out to be too big (1/2″). Existing chasis dimensions rechecked and found to be as plan. Better too big than too small and within the allowance for spare tube in the stock length so no problemlo
Stage 2
Originally Posted 28/6/2004
28/06 After trig hell in producing calculations for correct tube lenghts for LA and LB cut a section with correct angles on one end then repeated cut at 321mm up the tube to produce section of nearly the correct size, finishing off with rough file was all that was needed to get the tube to fit.
27/06 begin with cutting uprights marked H (nae problem whatsoever)However started cutting lenghts for front section (LA -LD) The book seems to be incorrect with its cutting lengths for LA and LB as when profiled and offered up the assembly was going to have incorrect dimensions.
Thankfully the sections cut can be used elsewhere.
Stage 1
Stage one completed (minus frame rails G1 and G2 to be added when appropriate gearbox is located to ensure engine installation will be correct.
Tubes
Originally Posted 22/6/2004
24/06 Cut and Profile C and E
22/06 Profile D1 and D2 (laid base tubes on board and measured diagonals which seem to be as book specs)
21/06 Managed to cut F1 and profile F1 and F2
Cut D1 and D2
24/06 Cut and Profile C and E
22/06 Profile D1 and D2 (laid base tubes on board and measured diagonals which seem to be as book specs)
21/06 Managed to cut F1 and profile F1 and F2
Cut D1 and D2
Where did the time go
Originally Posted 21/6/2004
Steel never arrived until wednesday lunchtime, commitments meant nothing was done until the following Saturday, Spent a long time cutting depressingly few tubes but begining to regain the skill of rough cutting and filling down to line.
Current status is 7 tubes cut (A1,A2,B1,B2,K1,K2, and F2)
Thoughts :- Given that gaps are required between tubes to allow good weld penetration, the angle of cut (replicated on both sides of a tube) is more important than a perfectly finished tube end.
Awaiting Steel Delivery
Originally Posted 14/06/2004
Steel Ordered, Garage Given a tidy up
Unfortunately my hammer drill has packed in, which I need to mount my vice and bolt build surface to floor of garage, as its developed a bow.You’d think Bosch gearboxes where made out of something other that die cast keek.
C’est la vie
So! a quick trip to B&Q in the morning followed by anxious pacing up and down like an expectant father awaiting the delivery
Sunday, 1 November 2009
Subscribe to:
Posts (Atom)